8.30.2011

Dishwasher and Trash Bag Organization

I once saw someone loading silverware in their dishwasher like this:


And I thought..."So simple, yet so genius!" I would rather put the silverware into the dishwasher by category (one section of the basket for knives, one for forks, one for spoons, etc.) so that it's easier and faster to put away when clean than have to weed through tangled massles of silverware in the dishwasher and categorize it as I put it away in the silverware drawer. I guess you have to sort it at some point either way but since I hate unloading the dishes, I'd rather not have to add the extra step of sorting the silverware into that job.

So I have completely formed a new habit of loading my dishwasher this way and I'll admit, it does kind of bother me when I see someone else do it differently. But...still, I'm not going to correct someone who does my dishes for me! That would just be idiotic! 


On another note, the other day I noticed that the right side of the cabinet under our kitchen sink was beginning to look like this.


And this is not good. Not only is it hard to find things, but the left side contains two pull out trash cans. And when the right side looks like this I risk getting a bottle of cleaner, etc. wedged in behind the trash cans so they can't slide back on their track. It was time to do something.

One of the biggest problems here can be seen in the lower left corner of the photo: the spare shopping sacks that I re-use as trash can liners. They were overflowing out of a large plastic container. And there was an empty Clorox wipes container perched on top of them. Why, you ask? Well, I had decided a couple weeks ago that I should try out this little idea I found on Pinterest:


But, as usual, I'd put that off for another day.

So after purging some bags I didn't like anyway, and placing 10 and only 10 inside my wipes container and just generally rearranging and putting things where they belonged, the cabinet looked like this! I have 3 types of trash bags, 1 wipes container holding plastic bags, one tupperware for rarely used cleaners in the back, one tupperware for frequently used cleaners in the front and the dishwasher soap.


Much better, huh? Now, I must just force myself to keep it that way!

8.29.2011

Kitchen Post #10 - Financial Breakdown

Some of you may be wondering just how much our kitchen remodel ended up costing. I know I would have been curious before I started on our remodel... So I'm going to attempt to break it down here. These are all approximations that I'm pulling from memory...but they should be fairly realistic.

Actual DIY Kitchen Remodel Financial Breakdown
  1. Cherry Custom Cabinets (Tools, Lumber) - $3,400 (but $1,900 of that, the tools, can be used on future projects)
  2. Countertops - $1,500 (but $1,000 of that, the tools, can be used on future projects)
  3. Electrical - Free (bartered)
  4. Lighting - $300
  5. Appliances - $2,500
  6. Sink - $200
  7. Floor Tile & Supplies - $700
  8. Backsplash Tile & Supplies - $200
  9. Drywall / Painting Supplies - $150
________________________________________________________
Total = $8,950
(minus $2,000 of that which was tools that can be used on future woodworking/tiling projects)
Total = $6,950

For fun, let's consider what the same kitchen would have cost if we had paid for the labor and installation of custom-built cherry cabinets and granite slab countertops. Again, these are basic approximations...

Theoretical Kitchen Remodel Financial Breakdown

  1. Cherry Custom Cabinets - $12,000
  2. Granite Countertops - $3,700
  3. Electrical - $3,000
  4. Lighting - $500
  5. Appliances - $2,500
  6. Sink/Plumbing - $400
  7. Floor Tile & Supplies - $2,000
  8. Backsplash Tile & Supplies - $300
  9. Drywall/Painting - $1,000
________________________________________________________
Total = $25,400

So essentially we saved $18,450 by doing our kitchen ourselves. And possibly even more. I don't even know what plumbers / electricians / cabinet installers typically charge since I didn't have to pay any. Anyways, gotta love DIY, right? It's the way to go in all areas I'm finding. And I'm lucky I married a man who is a "Jack of All Trades". I truly think that's how I'm able to be a stay at home mom these days, since we save so much money on everything!

8.26.2011

Five Favorite Finds!

I spend lots of time {too much} each week reading other peoples' blogs. It's no secret. I find the blog world very inspiring!

So this week I thought I'd share FIVE of my FAVORITE FINDS!

1. I recently became a follower of Maillardville Manor and read her post about meal planning here. And of course that lead me to The Project Girl's free weekly meal planning printout.


This meal planner is revolutionary! It allows you to plan out your dinners for the week on one side and then make your shopping list on the other side of the paper. I LOVE it! Just printed out 5 copies to put in my little household binder. What a great tool.

2. Midweek I was checking out one of my favorite blogs: IHeart Organizing {where I was featured a couple weeks ago} when I saw this amazing dressing room from Honey & Fitz. Guess what...now I'm following Honey & Fitz too! Isn't this room AMAZING? I LOVE those yellow curtains. That is totally not something that I would have thought of choosing for the space but they look spectacular. I need to take more risks... And who wouldn't love to have that Elfa system?


3. I also absolutely loved the step-by-step tutorial on recovering/refurbishing this rocking chair on YoungHouseLove this week. This is something that I would also have been terrified of attempting....but now I feel like maybe I could! I would love to call something like this my own. Awww...


4. I also found this awesome Fettucine recipe this week on this Only From Scratch. It was absolutely amazing. I made it last night for dinner {using tomatoes from our neighbor's garden that they shared with us} and Dave was overjoyed!


I have never made actual fettucine before and this was so easy! Although I must say it is fattening and I probably won't be making it too often. And I would love to try it with chicken instead of sausage sometime.

5. Someone recently became a follower of my blog who also follows A Slob Comes Clean...I thought I'd check out that site and found this wonderful list of weekly house cleaning tasks (scroll down for a link to a printable version). I like her idea of creating a list of "non-negotiable tasks" since I also don't have "cleaning intuition" as she calls it. Here's a little excerpt from that blog post:
"Remember, I have no “cleaning intuition” like normal people have. If I wait until I notice the need, have the time, and feel the urge to clean all at the same time, I end up waiting for a very long time. Knowing that I clean bathrooms on Tuesdays means that I plan my day around getting that done. Otherwise, I plan my day and cleaning the bathroom never enters my mind."
It is like she put into words exactly what I've been dealing with over the past couple years!! I've just recently been assigning myself daily tasks that I must do for certain days of the week but I somehow always make excuses why it doesn't work on that particular day. So if I make them "non-negotiable" in my mind, maybe that will help. It's all about discipline, I guess.

~~~~~And this is just a glimpse of all the amazing inspiration I found out there in blog world this week. It is so fun to be able to read and share ideas with all the wonderfully talented people out there! I love blogging....sure beats my old day job {engineering sewer systems!!}...

8.25.2011

Kitchen Post #9 - Appliances - Selection & Review

We spent a lot of time discussing kitchen appliances in our household. We both agreed our old fridge had to go. It was a circa 1908 model....and next to our new cabinets it looked like a complete dinosaur.


But being the tightwad I am, I thought we could somehow convert our portable dishwasher {that we'd bought 5 years before on ebay for $100} into a built-in. And I knew we could continue using our black/stainless electric range. But Dave finally convinced me that our new custom cherry cabinets and granite counters "deserved" a matching set of new appliances. Not to mention, he argued, we could probably get a deal at the store if we bought a whole set at once.

So then we had to discuss what color appliances to purchase: stainless, black, white, etc. as well as which brand: Whirlpool, Frigidaire, LG, etc. My husband never wavered from his position of wanting stainless. I believe I've mentioned before that he has "expensive taste", so you understand, right? But he also argued that that's what was popular these days and we were fixing our house to sell it, so it would be wise to put stainless steel appliances in the kitchen. I agreed with that logic. Still, I was nervous. I knew we would have children someday and I feared that our fridge would end up looking like this on a daily basis


and I would never clean it and therefore we'd end up having an argument on a daily basis about how poorly I keep house. And, seriously, what intelligent housewife wants to set herself up for daily failure??? I origingally thought I wanted black appliances but once I saw the new black appliances on the market I realized that their glossy finish (as opposed to the textured finish of the 90s) would also show fingerprints just as much. So I figured we might as well get stainless.

So we hit our home away from home, Lowe's one evening and browsed the appliance section. We were pleasantly surprised to find that the Frigidaire Gallery collection has some sort of smudgeproof coating to resist fingerprints. Not to mention we loved the stainless steel/chrome handles they had resulting in a lot less black plastic on them like the Whirlpool collection. And we found a fridge that was 20% off because it was last year's model or something like that. So that saved us a ton of money.

So what do I think now after having these appliances for 8 months? I'm SOLD! I would buy them again (and in fact, I may - if we sell them with this house...haha!). All in all, we generally clean the handles on a weekly basis since they get touched a lot, but the rest of the appliances have been cleaned maybe 4 times in 8 months. (And I just use the Method brand stainless steel clearner.) Fingerprints just don't happen with that special coating. Even with a toddler rubbing all over them 1000 times / day. I'm SO happy with our purchase. Not to mention they look AMAZING!


The other thing to not is that we have a glass cooktop on the stove. A lot of people wonder how easy/not easy that is to keep clean. It came with a special ceramic cooktop cleaner and sponge. We follow the directions with it to clean a big mess and it comes off no problem. And we just use plain old glass cleaner for easy to clean, everyday messes.

The other feautres that I absolutely LOVE about our new appliances are the delayed start features of the oven and dishwasher. I can put our Sunday lunch in the oven before church and we come home to a baked meal. Yum! Certainly takes away the temptation to go out to eat on Sunday afternoons, saving us lots of money...And I almost always set our dishwasher to run in the middle of the night to keep from using hot water before our showers in the evening.

Anyone else particularly fond of their new kitchen appliances? Tell me why!

8.24.2011

Kitchen Post #8 - Travertine Floor

The very first thing that we purchased for the kitchen was the travertine tile for the floor. We found the 16" square tiles on clearance, believe it or not, at Lowe's at the same time that we bought the tile for our Hall Bath. Thankfully it was a neutral tan color that would pretty much match anything so it didn't matter that we hadn't even chosen our cabinet finish or countertops at the time. :)

So we stashed our 2 giant piles of travertine in our carport for 2 years till we were ready to bring it inside, where it sat IN THE WAY in our living room for another 6 months or so till we were ready to install it. Hence the photo below...


Here's a photo of my handsome hubby laying down the first of the floor tiles. We began the project by gluing and screwing backer board through the original wood floors of the home into the floor joists. The backer board will not expand/contract as much as the wood so it is a better surface to tile on.


Here's the floor after day 1 of tiling...


Anyways, since we have installed the travertine flooring I have been absolutely in love with it. It has so much character since it is natural stone. And it also helps that it is the "color of dirt" as Dave says. You hardly have to clean it! But when you do, it cleans up like new with a microfiber mop and water.

This is a photo of the kitchen floor. We have a step down into our living room from the kitchen. My husband went ahead and installed travertine on the wall under the step. He calls it his "travertine waterfall" - we are in love with it. I think it is a great way to transition in this awkward location. And our little man Levi loves to play here on the step while we work in the kitchen.


Check back tomorrow for the story of how we selected our stainless steel appliances and how we like them now.

8.23.2011

Kitchen Post #7 - Tile Backsplash

We decided to use a 2" square travertine tile for the backsplash that matches the travertine flooring nicely.


We did not bother using a special tile backer for the backsplash. We just applied pre-mixed mortar (comes in a bucket) to the drywall, and stuck the 12" square meshed together sheets of tile to the wall. After the adhesive had fully cured, we grouted the backsplash with sanded grout and then sealed it according to the directions with an appropriate tile sealer.


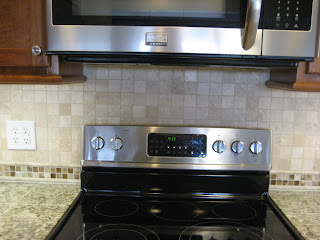
My meticulous hubby, Dave, did a fantastic job cutting the tiles to go right around the curved bottom molding on the cherry cabinets. You can see his handiwork here under the microwave.


We wanted some sort of transition between the travertine backsplash and the granite counters. We ended up choosing glass tiles that came with a travertine border. They are my absolute favorite part of the kitchen! So elegant!


Sure beats our old "faux gray brick backsplash" doesn't it??


That puppy was made of styrofoam...LOL!

It is amazing the difference that a decorative backsplash makes in a kitchen, and it requires such little effort in the whole scheme of things. I think it would be a fabulous way to upgrade just about any kitchen. And there are so many amazing options out there (tile and otherwise)!

You could use tin like this:


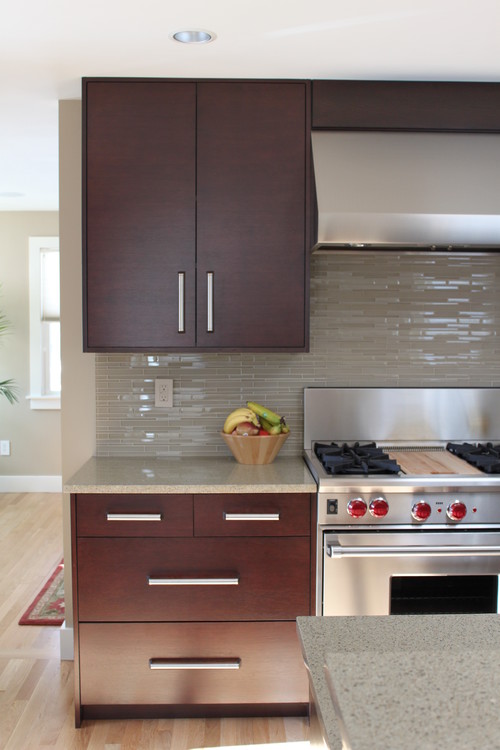
And I absolutely love this tile backsplash!


Kitchen Remodel contemporary kitchen

and this one!


Or what about a stainless steel backsplash?


Penny tile would be another really cute option.
Here's some I found on overstock.com!


Or what about versatile beadboard? Last summer I saw this very helpful tutorial by Thrify Decor Chick and was forever inspired!


Or you could even cover your backsplash with inexpensive pegboard and paint it a glossy bright color like this. Not only is it cute and different but it also adds a lot of function.


This has got to be one of my favorites...a mirrored backsplash. It would really help make a dark, small kitchen seem much brighter and more spacious!


And for probably the cheapest backsplash makeover of all - just paint it! And choose a fun color of course.


And just so you know, I'll be posting later this week about our travertine floor tile and our stainless steel appliances so come back for more kitchen fun!

8.19.2011

Upcoming Dresser Makeover

I'm so excited to announce that I'm making plans to visit my sister's house soon to help her makeover two dressers for her master bedroom. I can't wait to reveal them to you when they're finished. This is going to be so much fun. To me there's nothing more fun than a little DIY project done with close family members.

And, rumor has it, while the paint is drying on the dressers we're going to make a quick trip to IKEA. Ok, who am I kidding? We once spent 5 hours in IKEA together. It probably won't be that quick. LOL...but yeah....that paint will take time to dry....

So, anyways, back to the dressers, I think we're sticking to a pretty neutral color scheme, but it's going to be so much fun! Not to mention my little man, Levi, is going to get plenty of quality time with Auntie's doggies. :)

In the meantime, here are a few drool-worthy photos of painted furniture I've found on Pinterest. You can find sources on my Pinterest boards.


Apparently I have a thing for bold colors right now? Probably because I've done a ton of neutral stuff in this house and I'm hoping to branch out in the future and do something a little more fun!

8.18.2011

Kitchen Post #6 - Electrical & Lighting

I believe in one of my previous kitchen posts I mentioned that we had to relocate our breaker box from the kitchen wall to our laundry room. It can be seen here, to the left of the stove/dishwasher-on-wheels:


 Originally, we had planned to just place an 18" wide wall cabinet with the back cut out in front of it and be done with it. We could just open the cabinet door and reach in to access the wiring. But in talking to our friend, a home inspector, he recommended that we really consider relocating it. He was concerned that when we went to sell our home, depending on the inspector, we might be required to relocate it then anyways, as you really shouldn't have a cabinet in front of the panel, at least in Indiana. So, we spoke with an electrician and he quoted us something like $3,000 to do that. Um. No thank you. That would have seriously blown our budget. Considering we had like NO budget for electrical relocations. So.....luckily I have a creative husband who ended up bartering with the electrician. It pays to have skills, folks, even if they're not the ones you really need at the time. You can always barter! So Dave worked on Kirby's truck in exchange for Kirby to redo our wiring. And our friend Jack, who works for the electric company, saw to it that our line was buried from the road to the house and our service was upgraded. Woohoo! Another serendipity of that is that while they were upgrading the service they found that the main electrical line coming into the house was, well, scorched. Or something bad like that. Basically it could have burnt our home down at any time. So, God was defnitely watching over us! Hours and hours later, and one week exactly before our baby was born (can you say, "impatient pregnant woman"?) we had newly buried 200 amp service and a brand new breaker box in our laundry room with extra space for more breakers in it! And all new wiring in our kitchen. That was a huge blessing considering we were never able to run the dishwasher, light and microwave at the same time in our previous kitchen. And we went from 2 working outlets to 21 in the new kitchen!!! I love that. Never before could I run more than 1 appliance at a time since our stove took up on of the outlets. I had to mash potatoes in the laundry room on more than 1 occasion!

Now onto the kitchen lighting...our kitchen originally had a ceiling fan and 1 fluorescent under cabinet light. See the before/in progress photos (above and below)....


Our ever-so-unofficial "lighting plan" involved installing some can lights above the sink/dishwasher and replacing the ceiling fan in the center of the room with another one that was lower profile and prettier. However, once we installed our new cabinets, not only did we realize that the fan was off-center in the room, but we also saw that it was just too low for a light and not nearly bright enough. We even purchased a low profile ceiling fan and held it up there but it was just too low to light the room very well. And we love light in this household. 


And it blocked the view of the gorgeous new cabinets (and we could only imagine how it would block the view of the crown molding once it was installed). So we decided to give up on having a ceiling fan in the kitchen and just install a ceiling light. While we were at it, we centered it in the room. That involved Dave cutting a new hole in the ceiling and actually using the round piece of drywall that he cut out for the new hole to patch the old hole. But you can't tell now after a bunch of mudding and "re-texturing"...{FYI, you can buy textured paint at Lowe's to fix small areas like this!}

When that was said and done, we still found it much too dark for our taste just having a light in the center of the room. So we decided to add 3 can lights above the area where our stove would go. We knew that would provide a lot of needed light in that dark corner. So I covered up all the cabinets with plastic and towels so our dishes would not be covered with dust when Dave crawled up in the attic to cut the holes and install the cans. This is what we ended up with.


*And note that the reason there's no light in the middle of the room in the above photo is that poor Dave broke the globe on our new light as he was taking it out of the box. So we had to order a new one. $60 and 2 weeks later, we installed the new one. Hhhh...the realities of renovating...


I love the can lights. They really showcase our cabinets nowadays.


We also installed 3 pendant lights over the bar counter (you can kind of see them in the background above).


So that's it for our little Kitchen Electrical / Lighting story. Have you ever changed your plan once you saw stuff in real life like we did?
Related Posts Plugin for WordPress, Blogger...