Showing posts with label Crafts. Show all posts

10.06.2012

31 Days of Pinterest Projects - Day 6 - Margaret's Sewing Room {Planning Stage}

As I mentioned last night, I went to my sister-in-law, Margaret's house today to begin work organizing two of their spaces - the sewing room and the basement.

For now, I'm going to post just on the sewing room and the plans that we made for that space. You see, Margaret operates her own home-based business doing alterations and quilting and sewing projects for others. Her work is fabulous! And this sewing room is where she does the majority of her work. She expressed to me last winter that she would love to add several layers of organization to this space to make it work harder for her. And I agreed to help her with that! {And as a side note, she's right there with me in thinking that Pinterest is one of the best tools EVER invented.}

For starters, here's a BEFORE floorplan of the space. The doorway at the bottom of this photo is from the hall, and the doorway to the right of the Desk and Ironing Board goes into the bedroom. Margaret's husband, Rod, is going to close off the doorway to the bedroom and re-drywall this area to make more workspace inside the sewing room. Margaret also plans to remove a bakers rack from the room in leiu of other storage options.


Unfortunately, I forgot my camera today, but I do have a couple photos that we took last winter to show where we're starting. Since these were taken, Margaret has already done several big clean-up projects, so this is really not the best "before" illustration, but it will give you an idea. (Hopefully she doesn't get mad at me for posting this...LOL!)

In the following photo, you can see Margaret's sewing desk. It is a countertop spanning two cabinets with shelves in them. On the wall opposite her desk, she has an ironing board that she uses in conjunction with the sewing machine, and some hooks on the wall above the ironing board. On the far wall is the baker's rack (which will be removed and repurposed elsewhere) and a door that leads to the closet. Since last winter, Rod & Margaret have removed the closet door and inside are cubbies for current sewing projects.


Today we walked through the space and discussed what pieces were functioning well and what needs Margaret would like to be met.

DESK~
Her desk is working perfectly well as a workspace, but we did decide to add a couple organizing products to increase storage functionality.  On the right side of the desk, there is a cabinet beneath the countertop. It currently has two shelves piled full of scrap fabric. Margaret expressed that it is difficult to find what she wants when she wants it with this system. So we plan to purchase 4-6 shoebox size plastic containers to categorize and containerize the scrap fabric and then put them back into this same cabinet. We may sort it based on colors or types of material (cotton, wool, etc.) Also, we will "file" the fabric scraps rather than piling it in the containers, to make it easier to see all the scraps at once. Just like this pin:


The cabinet holding up the other end of the sewing desk will house other sewing supplies: elastic, ribbon, buttons, etc. that are currently on the baker's rack.


We discussed potentially purchasing an organizer or two like these three-drawer units I used for extra toiletries in our linen cabinet for separating these items inside her cabinet. Or we may continue using some of the acrylic ribbon organizers she already has (that she got for a steal at a garage sale!).

 
We will purchase another thread organizer from JoAnn's (like the one sitting on the countertop behind her sewing machine) and mount the two on the wall behind the sewing machine to free up her countertop for working.

STORAGE~
We will install another shelf or two inside the closet, underneath the cubbies that already exist for current projects. There she will be able to store larger, unsightly items such as batting and pillows. We will relocate the hooks from above the ironing board over to the wall next to the closet to hang current projects.

INSPIRATION BOARD~
With that reclaimed space above the ironing board, we will hang a very large inspiration cork board. We could have something as big as 4 x 8 ft!! Margaret is very visual and she loves being surrounded by colorful, beautiful images while she works, so this will be spectacular! As you can see, the standard size bulletin board she currently has is just not large enough :)

 
CUTTING STATION / STORAGE SHELVES~
With the new workspace that will be added in place of the bedroom doorway, Margaret & I planned that we will paint this wall a fun purple and install some sort of fold out cutting table that will normally be 12-18" deep but could fold out to 36" deep. And above that table we will install two shelves. There she will be able to store fabric along with binders - one for client invoices, one for inspirational clippings from magazines, etc. and one for current client projects. The photos below, we both pinned when we thought of these shelves.


SCHEDULING / PROJECTS~
On the wall just to the right inside the door from the hallway, we will hang (decorated) clipboards to hold inspiration for current projects and hang a large calendar (not sure it will be a chalkboard calendar or not) to keep her on schedule with fittings, etc. Once again, we got both these ideas from Pinterest :)


FLOORPLAN~
Here is an after floorplan that sums up what we plan to do:


Even though we didn't technically finish any Pinterest projects today, we are headed out to the store Monday afternoon together to purchase all the containers and supplies we need to get this party started! I'm SO looking forward to this!!! I just love taking a space that's just not quite working for someone and making it fully functional!!


11.07.2011

Most Versatile Piece of Furniture - The Armoire

You know, I'm beginning to think that armoires are one of the most versatile pieces of furniture in the entire world. They rank right up there with dressers and storage ottomans, but we'll save those for another time. ;)

After moving our office into a computer armoire that we scored for $100 from Craigslist back in August, I just CANNOT stop singing the praises of the armoire.


There's just something so appealing about forcing yourself to contain all the clutter of one aspect of your home inside a nice cute little piece of furniture that you can easily close the door on.


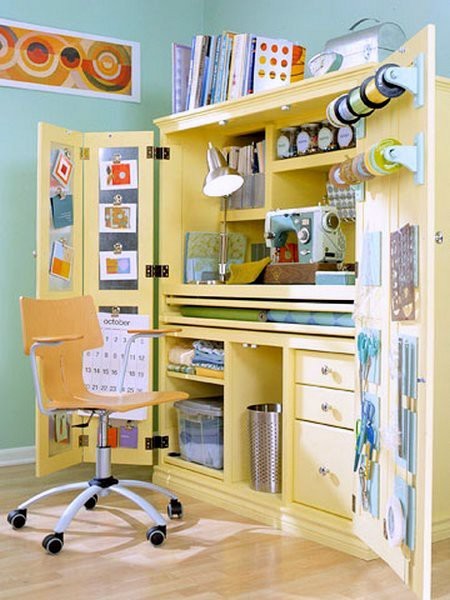
I could have one in every room of the home. You can use them to hide TVs or computers, or you can set up a little craft or sewing station like these gals did:


Or you can use them for clothes in a bedroom that lacks a closet!


Or create a stand-in coat closet in an entry way that lacks one...like I mentioned in last week's post.


Or you can repurpose your armoire as a freestanding pantry for food or dishes in a kitchen that lacks cabinet space.


And while you're at it, check out this fabulous armoire makeover by Lisa from Recaptured Charm. The before/after is amazing!


The possibilities with armoires are endless...craft cabinet for the kids, book storage, DVD storage, CD storage, a place to keep files that's much cuter than a metal filing cabinet. You can line the inside with gorgeous wallpaper, fabric, paint it a bright color. You can do anything with this piece of furniture. And they are pretty easy to come by at garage sales, flea markets, Craigslist. Also, as Ange, from The Blooming Hydrangea, pointed out to me once, the fabulous thing is that you can take an armoire with you when you move! ...Can you tell I have moving on the brain? Just one more week. . .

What other pieces of furniture do you find extremely versatile in your home? Have any of you used an armoire for a surprising purpose that I did not mention here?

10.26.2011

Day 26 - Clutter Free Craft Storage - Bethany's China Cabinet Repurposed

My friend Bethany left this comment on my Dining Room post from last Saturday when I was discussing unusual uses for china cabinets. 


"I have a built in china cabinet like the one in the bottom picture, but it's positioned right behind our table, so I can't store dishes in there--it's too difficult to get to frequently. I was wondering if you could give me ideas or better yet--pictures of how I could use that space. I was thinking it would be fun as an art supply cabinet, but I don't have good storage ideas for all the supplies--ribbon, scrapbook stuff, glue, paint, markers, brushes, etc."
I instantly remembered seeing it when she posted pics of their new home online a few years back. It has glass doors and is built in the wall, kind of like this one. 


I asked if she'd ever considered covering the glass doors but she said she'd rather not.


So my challenge was to find ideas for craft storage that would be both functional and attractive, since you'd be able to see it through the glass doors from their dining area. As I began looking online, I realized that it really wasn't much of a challenge at all. There was simply so much inspiration out there. I think it has a lot to do with the fact that people who enjoy doing crafts also enjoy the challenge of making their craft stations look nice. 


If there was anything challenging about this it was deciding what photos to share! In fact, I'm afraid my computer's going to crash with all the photos and links I'm sharing tonight.


First of all, the inside of the cabinet could be painted, wallpapered, stenciled or lined with fabric to help add a little pizazz to the space. Kind of like Ange from The Blooming Hydrangea did with the inside of the "Cloffice" in her former home.


Or it could be lined with materials to make it multifunction. It could be lined with cork. Or tin... as shown on the doors of this armoire. 


Tin's magnetic quality would be perfect for hanging papers with magnets or for those magnetic spice containers that could be repurposed for craft storage (buttons, paperclips, etc.)


Here's a really attractive space that I fell in love with. I've seen those chartreuse green baskets on sale at Target. And it looks like the "backsplash" area is covered with pegboard. That would open up a whole new world of storage opportunities if the china cabinet were lined with that. 

Here's more pegboard...


The inside could also be painted with magnetic chalkboard paint then repainted with regular paint to give a surprise magnetic quality to the whole inside like John & Sherry on Young House Love did here.


My absolute favorite idea for attractive ribbon storage involved using a tension rod inside the cabinet and looping the ribbon spools onto it. This would be super easy and inexpensive. Plus, it would be adjustable for bigger or smaller spools and wouldn't require any permanent alternations/damages to the china cabinet itself.


If it would work better to be able to easily transport the ribbon spools to the dining table while working on projects, the following idea would be very portable. I've seen similar baskets with small holes in them for sale at Target and the Container Store. And those baskets are stackable as well. 


Another inexpensive ribbon storage solution involves repurposing and beautifying an oatmeal canister. Check it out...


I am not sure how deep Bethany's china cabinet is, but perhaps some of the drawers/ shelves shown underneath this desk (in Jen's cloffice from IHeart Organizing) would fit inside for scrapbook paper storage. 


I actually purchased these same organizers from Target a few years back for my scrapbook supplies. Not sure if they still carry them or not. Here's my old scrapbooking table set-up (pre-blogging, de-cluttering days...)


The drawers shown in the cabinet below are not quite as attractive but could definitely be useful.


You could also use colorful storage boxes or magazine files for all kinds of supplies, papers, stickers, etc. And I LOVE the small white drawer units shown halfway down in the photo below. They are so cute!


Some of those storage boxes (similar to the turquoise ones below) even come with dividers in them like you'd see in a desk drawer for office supplies. I know I've seen letter boxes like that at Wal-Mart for like $7.


Small vintage suitcases could also be used to store supplies. See above and below...


Another tension rod use - make a "shelf".  It is shown here in a spice cabinet but similarly, this could be used for craft paints, glues, etc.


And you can not underestimate the power of a caddy. Here Jen from IHeart Organizing used a caddy for art supplies. This would be extremely handy for toting supplies around the house and then tucking them back into the china cabinet.


I am also a sucker for glass jar storage. There are so many examples out there but these caught my eye.


Mason jars coupled with pipe straps...genius!


Jam jars hanging underneath shelves - that could work!


Small canisters holding buttons galore!


Lots and lots of glass jars - beautiful!
And they even fit a sewing machine and some fabric in this china cabinet.


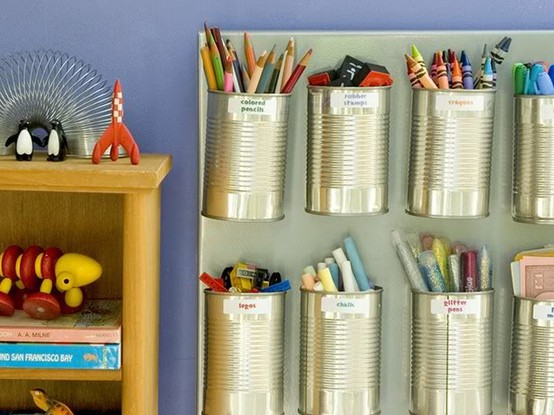
Moving onto repurposed tin cans...this would be so easy to do...


But if you don't like the "industrial" look, just wrap the cans with decorative papers.


Turn the tin cans on their sides and you've got another type of storage. You could put all kinds of craft supplies in here, rolled pieces of fabric, etc. I've also seen this done with pieces of PVC pipe.


A small lazy susan like the one shown below would add a ton of function to the cabinet.


Similarly, one of these Pampered Chef utensil carousels could work well for organizing paint brushes, markers, pens, pencils, etc.


Tackle boxes. So functional. So portable. Could be "beautified".


I love the look of the colorful storage boxes and the clean look of all the magazine files. I'm all about concealed storage. And labels!


Use a pipe strap from Lowe's on each box for a "handle". Be sure to check out the source here. This gal details how to make magazine files out of CEREAL BOXES!


I really think the key to this project is choosing attractive containers that really work well for the supplies that you have on hand and making sure that you incorporate some sort of labeling system that will help you to keep your space organized while you work.  And if you can repurpose something like food cans, cereal boxes or jam jars along the way that benefits the earth and your checkbook!

Plus, all of these options could be used not only in a china cabinet, like Bethany's, but on a bookshelf, in an armoire or a closet. Even on an open desktop. Anywhere you want to store craft supplies. 

And if you're not into crafts, a lot of these ideas could be used for basic home office storage as well. 
Related Posts Plugin for WordPress, Blogger...