Showing posts with label 31 Days of Change. Show all posts

10.28.2012

31 Days of Pinterest Projects - Day 25 - DIY Rustic Mudroom Bench

After being inspired by tons and tons of DIY furniture photos on Pinterest and then seeing what Dave built out in the woods a few weeks ago, I urged him to please, pretty please, build us a bench for the mudroom. Finally, he conceded.

The source of our lumber came when his dad hired someone at his place next door to cut up a few fallen oak trees into lumber for a lean-to that he's planning to build. He let Dave grab some extra slab wood with the bark still on and a few rough-cut 2 x 3's and with that, Dave fashioned us a fabulous rustic DIY bench. I am absolutely in love with this thing.

With the pieces of wood that he chose, it looks like they just sliced the tree in half long-ways and unfolded it to make the bench. 


It is held together with some mortise & tenon joints and a few square nails that we purchased from an Amish hardware store in PA a few years ago.


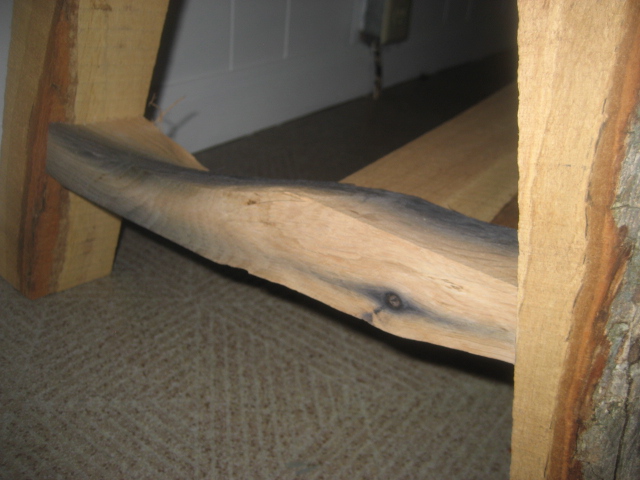
This piece of furniture has a story and I love that most about it. For example, this piece of wood holding the legs together on the left side has a blue streak in it. Phil pointed out that the streak came from a nail that he pounded into that tree 55 years ago when he built a tree house. As the tree grew around that nail, it discolored the wood. The nail is still in it.

Dave thought that story was so neat so when he needed a short piece to brace the legs together, he went back over and dug through a pile of split wood that was still sitting in the yard and picked this particular piece out.


We talked about staining it but I think we've both decided we love it just the way it is.


You just can't buy furniture this special. Seriously. It is the perfect addition to our mudroom.

What do you guys think? Would you love to have one? And isn't my husband a genius?

For the rest of this 31 Day Series, click here.


31 Days of Pinterest Projects - Day 24 - Mudroom Paint Reveal

Part of the reason I was MIA last week was due to the fact that I was painting my little heart out over here.

I finished painting the umpteenth coat of white on the walls and trim {if any of you are going to attempt to paint wood paneling, please beware, it WILL take a gazillion hours of coating and recoating...and waiting for a sunny day so you can see that you need to recoat yet again...LOL}. I also finished the second coat on the shelving unit and grabbed a roller on probably one of the last warm summery days of the year and painted the exterior doors of the mudroom.

Check it out. . .{we still need to put the light fixtures back up, add in the bench under the shelving unit and install a cabinet and hanging rod over the washer/dryer, but after having this area of our home dysfunctional since March, it is great to have it looking this done again}.


I was so thrilled to find that colorful rag rug that tied together all the colors in my vision for $20 just last week.

And yes, we went with ORANGE exterior doors. We discussed it forever and finally Dave said we should just go bold with the orange. It's different and it takes guts. And I'd seen lots of orange and blue on Pinterest and I loved it on there.

We did have a freak-out moment when we first started rolling that orange paint on next to some neon green Frog Tape when we thought it looked like our local Mexican restaurant (La Palma) but after removing the tape and the paint drying, we love it. We think it looks fabulous with the silver-gray siding and it's one of our favorite colors! As an added bonus, it supports the local Tigers :)


Here's my view from the kitchen :) I absolutely love all the bold colors with the crisp white walls. And that oil rubbed bronze door knob just makes me SO happy.


But I think the shelving unit is my absolute favorite part. The color is a greenish-gray that I picked up in the oops section of Walmart for less than $5. I think the paint color, the beadboard that we added to the sides, and the oil rubbed bronze spray painted hooks really create just the vintage vibe that I was going for. 

I had been planning to purchase a few wire baskets for corralling our necessities on the shelves but when the time came, I was feeling thrifty and decided not to spend the money and to instead grab baskets and containers that we already owned from all over the house. I'm loving the collected look I've ended up with.


Another great touch is the King Feed yardstick I just sat up on top of the hooks and the lantern that Dave scored from his brother's storage shed when they cleaned it out last week. Just fun little details that make it so special.

Now, for kicks, let's look back at what this space looked like when we moved in. We've come a long way, haven't we?


Isn't it amazing what a little paint can do? Do you all love it?

And now that I'm on a painting roll I'm itching to move onto the living room trim! 
What's your next painting project?

31 Days of Pinterest Projects - Day 23 - Family Photos

My sister, Emily, recently scheduled an extended family photo session with Drew & Laura of Castle Photographie located in Marietta, Ohio. I was thrilled about this session because after seeing all kinds of gorgeous photos and poses on Pinterest, I was hoping to find time to get some family portraits taken. And Drew & Laura's photos turned out better than I could have ever imagined!

Dave & I were just so amazed with how good they were at working with our son, Levi, and his cousin, Sam. They just let us all wonder around the family farm while they snapped photo after photo. There was no, "Sit perfectly still on this block of wood and look up at a 46.2 degree angle," followed by, "1, 2, 3, SAY CHEESE!" I just love how natural the shots are and how great the lighting is, etc.

Enough said, check these out! The photos speak for themselves.


My only problem is, out of 200-some photos,
I'm having a hard time determining which prints to order!

And if you're in Ohio, you really ought to contact Castle Photographie for your next family photo session. I highly recommend them!

10.22.2012

31 Days of Pinterest Projects - Day 22 - Paper Clutter Tips

Today I'm going to share three main tips that I have for reducing paper clutter around the home.

First, I'm a pile-r. And I like to keep everything out in clear view so I don't forget about it. But then all our flat surfaces end up littered with paperwork. And I hate that.

{imagine a photo of a countertop covered with papers}

And then I read and discussed this book by Marcia Ramsland last year with some other ladies from Oak Grove Mennonite Church {my husband's home church}.


Let me just say that this book is crammed full of great organizational tips and secrets, written by a professional organizer. I learned all kinds of stuff! {Like why hanging file folders have a crease about 1/3 of the way down....who knew?}

Anyways...one of the main take-aways I got from reading this book was to keep a file box out on your kitchen counter or main household work area to contain all of your piles and to keep important paperwork in one spot.


Marcia recommends using 5 folders for sorting your mail right when it comes in the door: 1. Calendar, 2. Holding, 3. To Do, 4. To Decide and 5. My Interests. The key is to only touch each piece of mail one time. I think what Marcia recommends is great, but I don't really have issues with not opening mail.

So I chose to adapt this system slightly for all my paperwork. I have the following folders:
1. Personal - To File
2. Personal - Action
3. Business - To File
4. Business - Action
5. Events {this is where I keep wedding invitations until the day of the wedding, that kind of thing}
6. Coupons/Menus
7. Emily {this is where I'm keeping some formula coupons for my nephew}

Since I've implemented this system, I have noticed the following:
1. our counters are cleaner
2. I'm more up-to-date on the filing {since I MUST file when the "To File" folders get too bulky}
3. I no longer have that "freak out" moment the day of a wedding or other important event when I can't remember where the directions are. {and that "freak out" moment was definitely customary in our household before this}

Second, I like to keep all of our supplies for paying bills in one spot - in a colorful accordion file from Target a while back. It is nice to have one designated spot for our bills so they don't get lost in the shuffle and aren't sitting out. As they arrive in the mail, I walk directly in the house and promptly slide them into the accordion file.

I have compartments inside for:
1. bills
2. stamps and return address labels
3. envelopes
4. a blank calendar for each month with the companies and amounts due marked on their due dates - as we pay the bills we check them off on the calendars

Everything we need to sit down and pay the bills is right inside.


Third, I like to keep important receipts in a small coupon organizer - another colorful find from Target.

I divide them inside by store: I have one for Kroger, one for Walmart, one for Target, one for Lowe's and the back section is for purchases from a variety of stores that we rarely shop at.

I clean the receipt organizer out about once a year.

How do you organize your paperwork? What is one thing you can work on this week to eliminate some paper clutter in your home?

10.21.2012

31 Days of Pinterest Projects - Day 21 - The Day of Rest


Since we moved last year we aim to do literally nothing on Sundays after church. We try to all three take a nap, we occasionally visit with other family members, but pretty much we simply do as little as possible. And I love it.

10.20.2012

31 Days of Pinterest Projects - Day 20 - Toys - The Ultimate Love/Hate Relationship

We all want our kids to be happy and have enough toys to keep them entertained and to help them learn new skills. However, it is NOT fun when those toys start to become a burden rather than a blessing, a nuisance around the house. My pet peeve is when I'm tripping on tractors while making dinner. Happens every day. Grrr...

Also, I honestly feel like kids can get overwhelmed when there are too many toys to choose from. They end up just dumping them all out and then flitting around from one toy to the next without actually playing with anything. :(

Our solution with Levi's toys has always been to limit the amount of toys that he has to play with and to clean them up every night before bed so he can learn to be responsible. He is a fantastic cleaner these days and we are so proud!

However, just a couple weeks ago it seemed like cleaning up was taking an extra long time every night so I loaded up a handful of tractors/trucks into a large storage tub and hid them in the basement. He hasn't even noticed and the amount of toys now is a lot more manageable. I plan to rotate them back in and take a few current toys out in maybe another couple weeks.

We keep the toys that Levi is currently playing with in a storage ottoman in his bedroom.


Here's a peek inside:


There's a magna-doodle, a puzzle, a toy laptop, 4 or 5 vehicles to drive around and some building blocks. (And his tricycle is located conveniently nearby!) Honestly, he could keep himself busy with just this stuff for days. 

He drags it all over the house and then we clean it up at night (putting it back in the ottoman). Every once in a while throughout the day he will ask for something that's in his closet and we will go get just that one thing out then shut the closet doors again. (And he can't physically open them himself.)

This is what the inside of the closet looks like:


We use the hanging shoe organizer (that I got at Big Lots) for various items (diapers, wipes, sheets, Baby Bjorn, stuffed animals, etc.) 


And the bookshelf that we got with a wedding gift card at Pier 1 makes a nice organizer for his toys. There's a bin for "tools",


 a bin for "cars", 


a shelf for his books,

a bin for his wooden blocks,


 large trucks and tractors out front where they can be easily accessed 


and larger toys such as his race track and barn on the top shelf.


Above all that is another shelf where we keep the "Too Big" and "Too Small" baskets that I mentioned here as well as a few larger toys to rotate out occasionally.


This system seems to be working for us now. For other ideas on organizing Kids' Toys, check out my post from last year during the 31 Days to a Clutter Free Home series

I think the key to keeping kids' stuff organized is limiting the amount that they have to begin with and then teaching them to abide by the organizational systems that are set up when it's time to clean up, just like with organizing adults' spaces. Cleaning up and sorting items will have to be something you spend time teaching and training them to do. But once they learn those skills, it should be easier to maintain a clean space.

For the rest of the 31 Days of Pinterest Projects series, click here.


Related Posts Plugin for WordPress, Blogger...